Getting Started
Payment Guide
Integration Tutorial
Fingerprint browser
Browser
Simulator
Proxy Manager
Operating System Settings
Integration Tutorial
Integration Tutorials
Fingerprint browser
Browser
Simulator
Operating System Settings
Integration Tutorial
Fingerprint browser
Browser
Simulator
Operating System Settings
PIA Client
Group Control APP
Step1:
Before integration, you need to complete the following preparations
1. Download, install and log in: Genlogin
2. Get the proxy IP, please refer to the tutorial: Static ISP
Step2: Proxy configuration
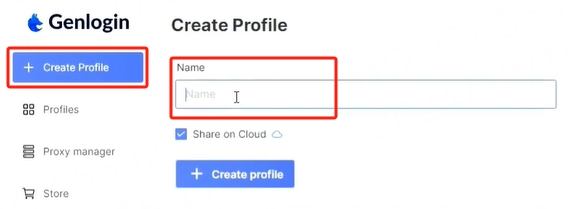
3. Open Genlogin, click Create Configuration, and give it a name

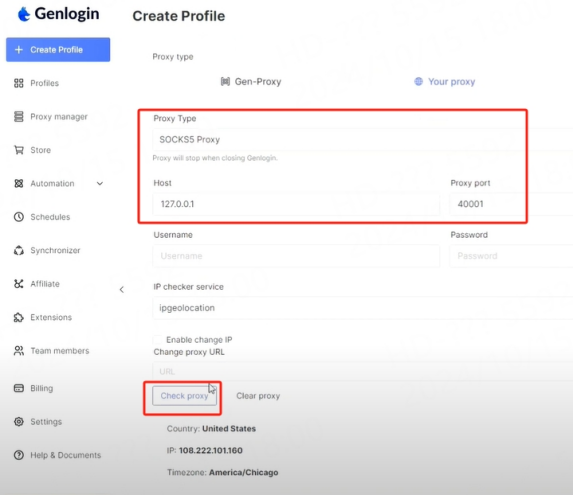
4. Select the proxy type as Socks5, then paste the copied proxy IP and port into it, and finally click Test Proxy

5. After the creation is successful, click Profiles, you can see the created fingerprint browser, and then click Start

This document provides you with everything you need to get started with our proxy
If you can't find something or need assistance, please contact us at [email protected] or via our 24/7 live chat.
Our file has two main parts. The first one is dedicated to PIA proxy integration proxy and the second one is dedicated to the use of the free tool
This section contains information about using free tools, where you can find the specific process and method for configuring each tool and proxy IP. Choose the proxy tool that's right for you and follow the guidelines for smooth integration.
If you need any assistance, please feel free to contact us at [email protected] We will try our best to help you solve the problem.
How long can I use the proxy?
How to use the proxy ip I used before?
How long does it take to receive the proxy balance or get my new account activated after the payment?
Can I only buy proxies from a specific country?
Can colleagues from my company use the same account as me?
Help Center